Woodland Wishes Joy Surprise Pop-Out Panel Card
Hello, friend, and welcome to the Team Stamp It Christmas in July Blog Hop!
Yes, it is July. Yes, it is probably hot enough to melt a Stampin’ Dimensional on the sidewalk. And yes, we are making Christmas cards anyway. 🎄
Whether you are arriving from another stop on the hop or beginning here, I am so happy you joined us. At the bottom of this post, you will find the complete list of participating designers, so you can continue hopping through all the Christmas inspiration.
Be sure to leave a comment on every blog using #stampitcontest for your chance to win this month’s giveaway.
Woodland Wishes Surprise Pop-Out Panel Card
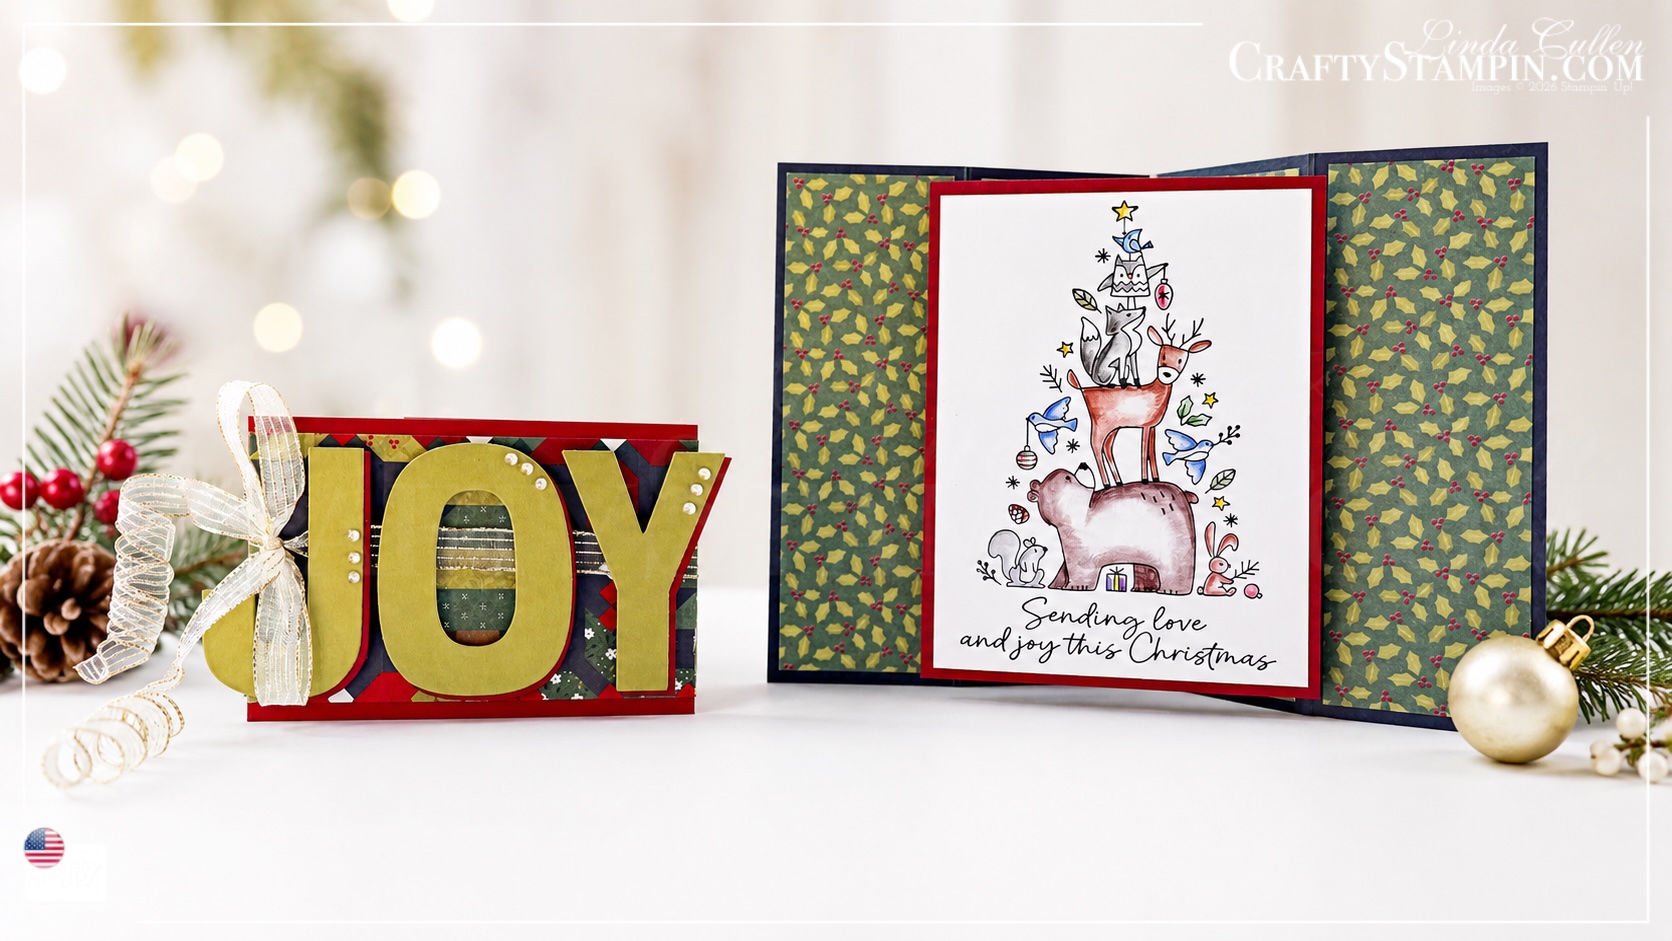
For my Christmas in July project, I created a Surprise Pop-Out Panel Card using the Woodland Wishes Stamp Set and A Stitched Season Designer Series Paper.
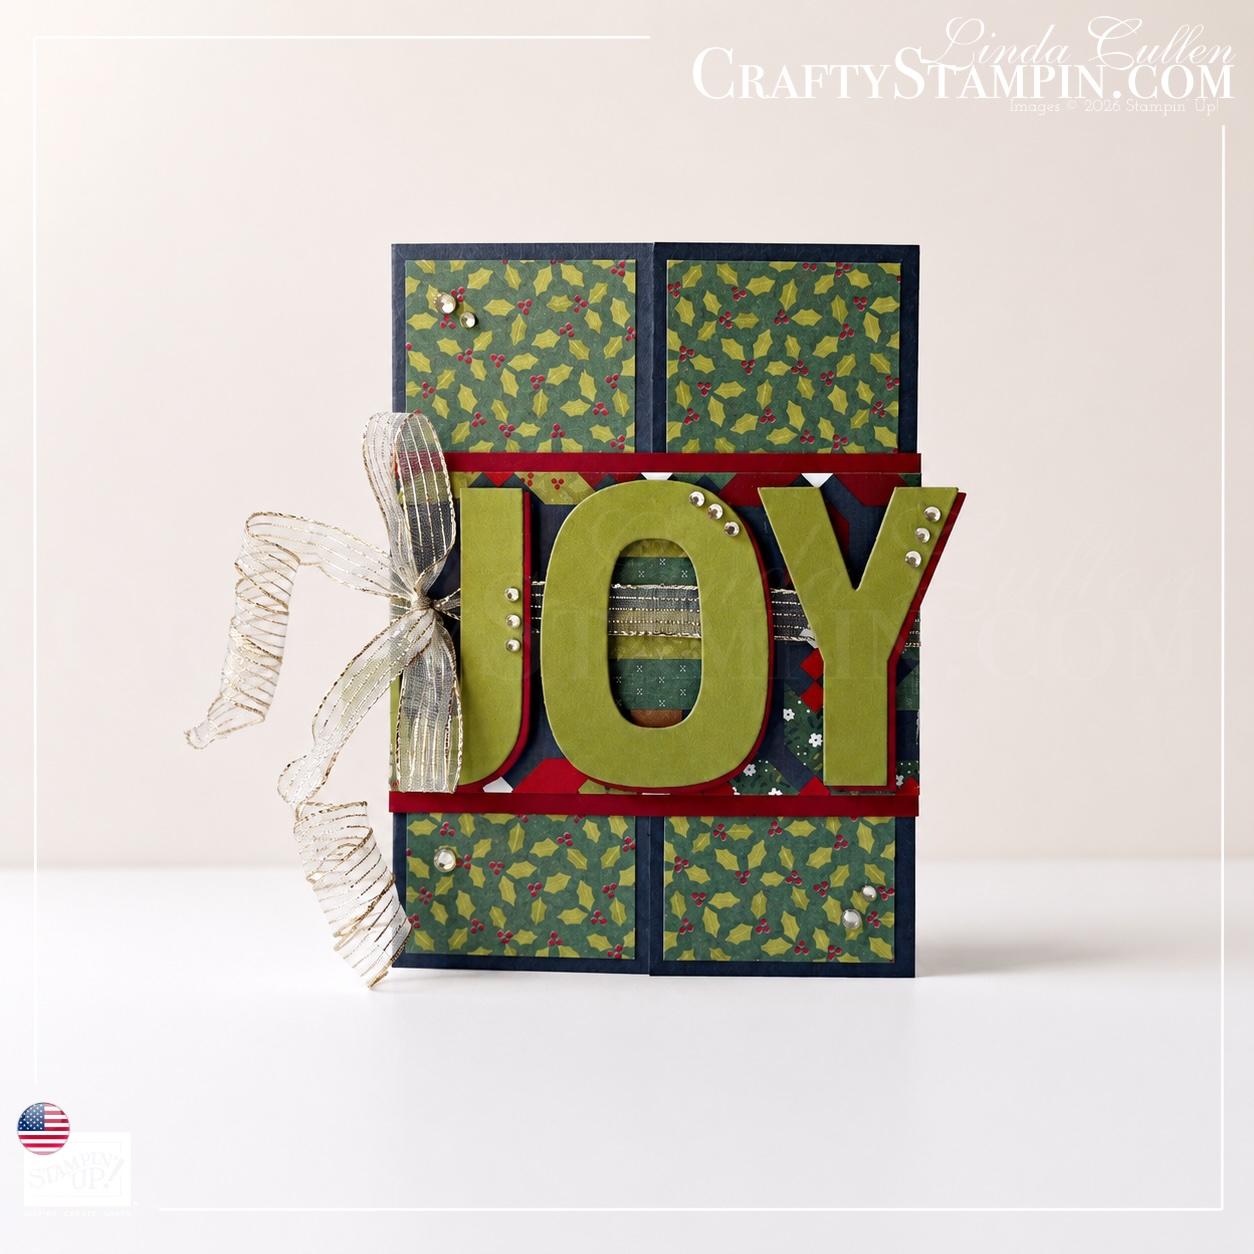
This card has plenty of festive personality before it is even opened. The removable belly band features oversized JOY letters, gold-striped ribbon, and a sprinkling of rhinestones. Slide off the band, open the folded card base, and the woodland scene pops forward from the center.
It looks wonderfully elaborate, but the construction is based on a few straight cuts and score lines. We love a fancy fold that delivers the drama without requiring an engineering degree.
The Woodland Wishes Image
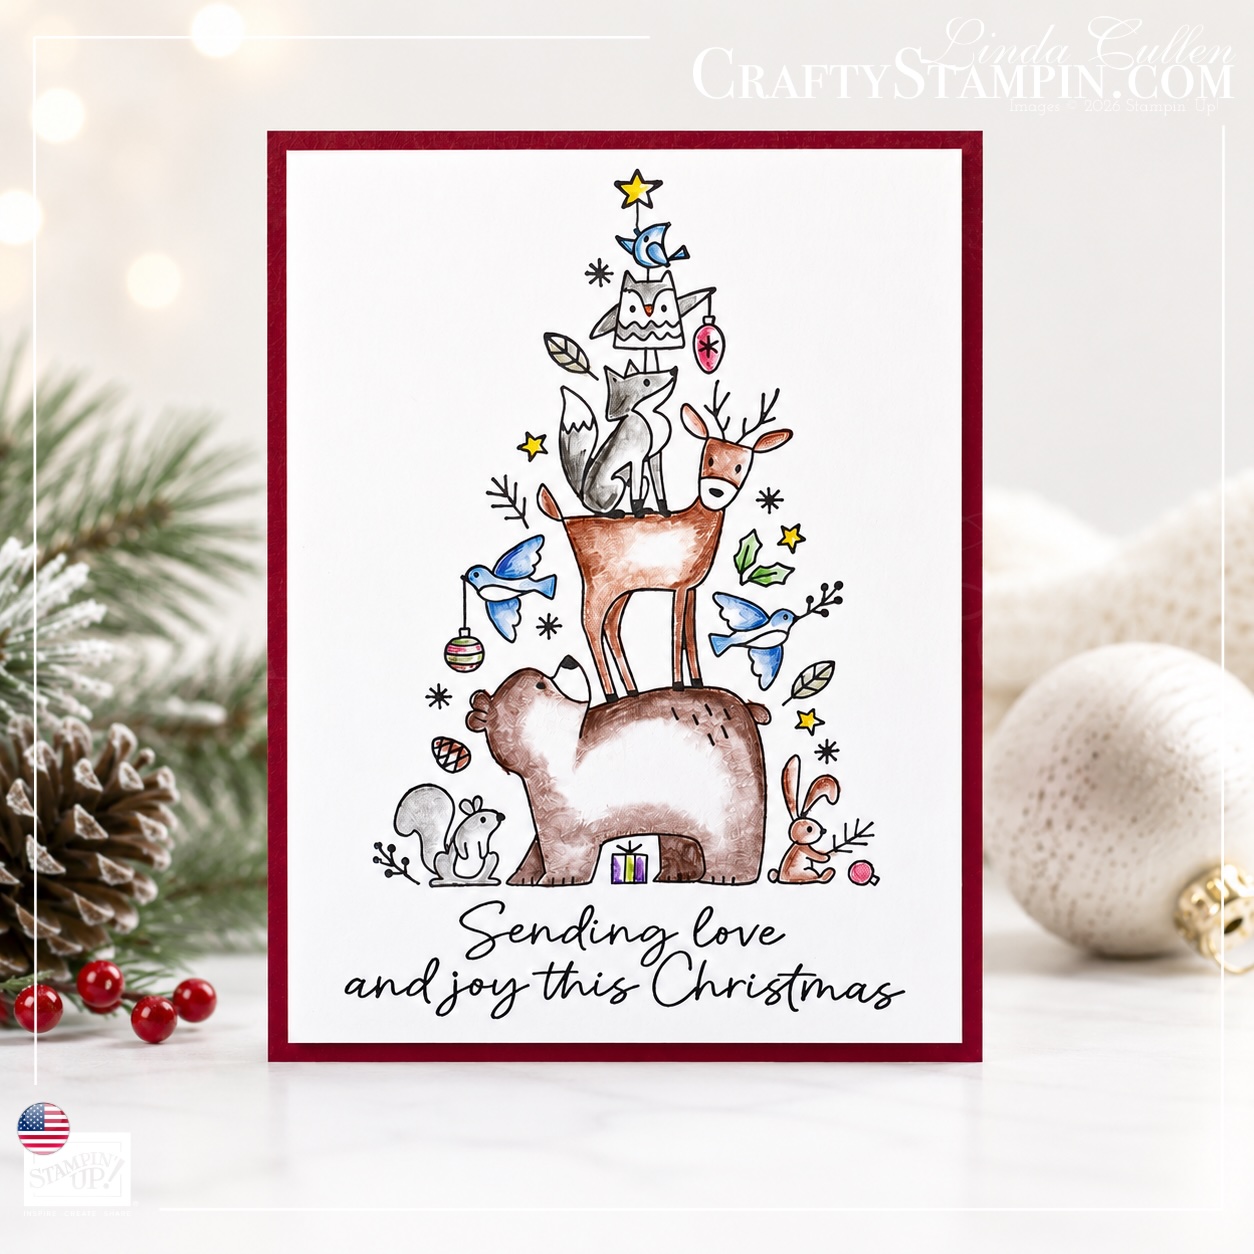
The tall woodland image from the Woodland Wishes Stamp Set is the star of the surprise panel. I stamped it on Basic White Cardstock using Secret Sea Classic Ink, then colored the animals and small Christmas details with Watercolor Pencils.
Blender Pens softened the pencil marks and helped create gentle shading while keeping the loose, hand-colored appearance of the artwork.
Watercolor Pencil Colors
I used the following pencil colors:
- Early Espresso for the bear.
- Pecan Pie for the deer, pinecone, and rabbit.
- Basic Gray for the fox, owl, and squirrel.
- Gorgeous Grape for the present.
- Granny Apple Green for the ribbon on the present.
- Cherry Cobbler for the ornaments.
- Daffodil Delight for the stars.
- Blue for the bird at the top.
- Balmy Blue for the flying birds.
- Garden Green for the holly leaves.
- Old Olive for the leaves and ornament.
- Basic Black for shading on the fox and owl.
- Night of Navy for shading on the flying birds.
You can keep the coloring light and playful, or add additional layers of pencil for deeper shadows. The woodland characters are whimsical, so there is no need to make every squirrel look ready for a museum portrait. He just needs to look festive.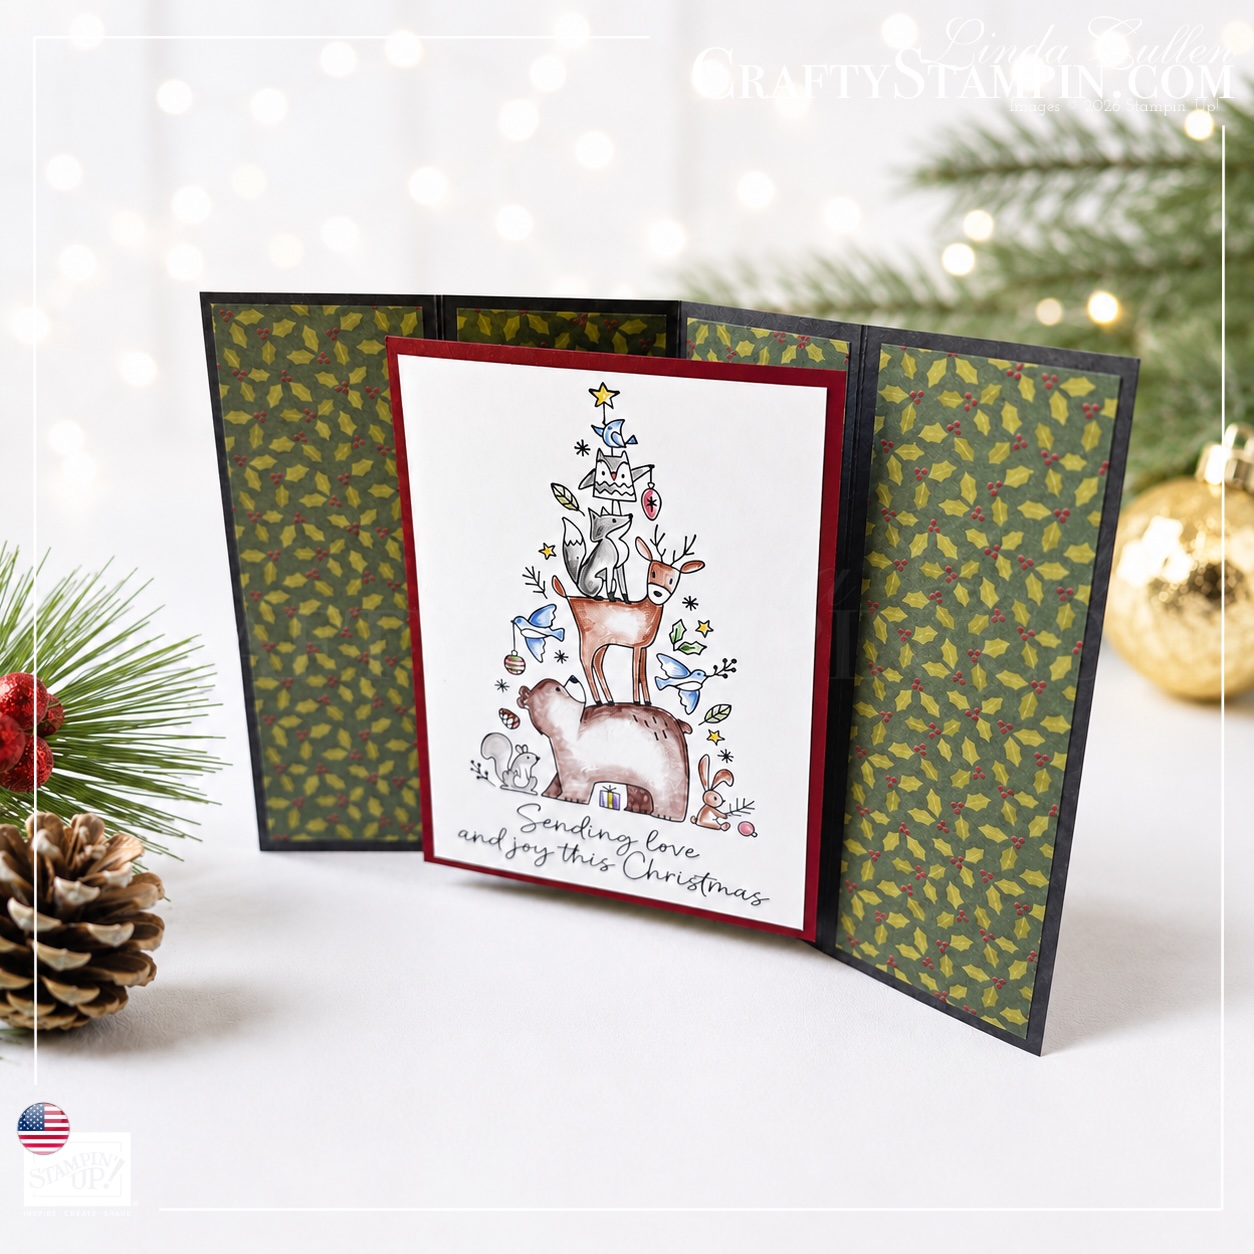
Surprise Pop-Out Card Measurements
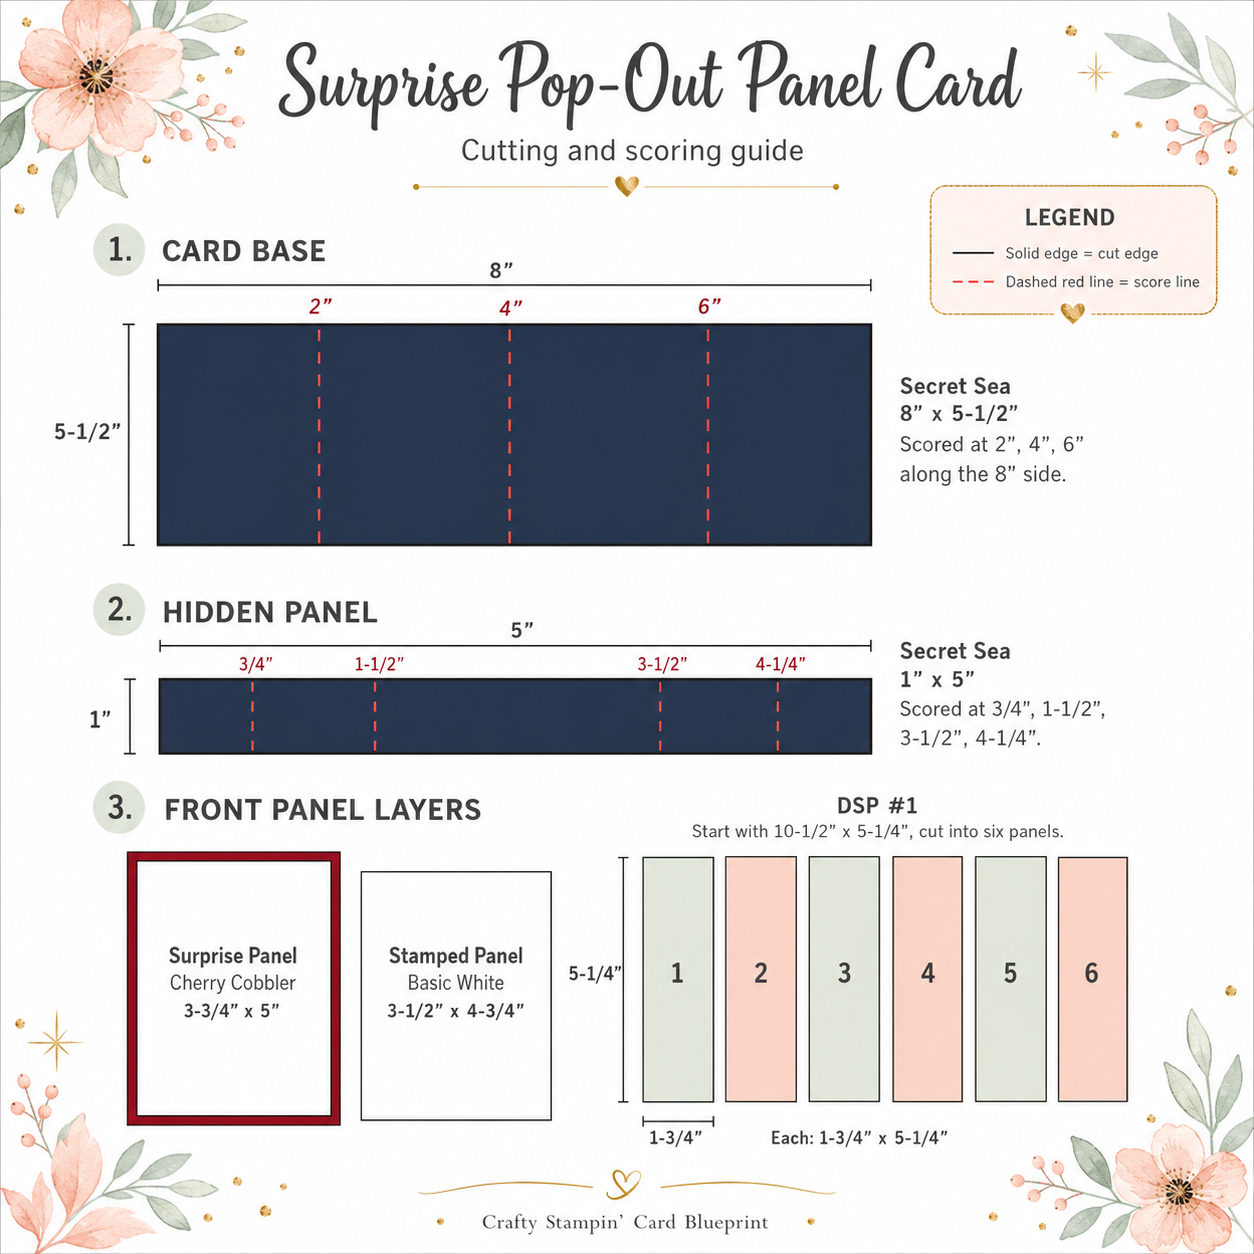
- Card Base
- Cut one piece of Secret Sea Cardstock to 8″ x 5-1/2″.
- With the 8″ edge along the top of your scoring tool, score at:
- 2″, 4″, 6″
- With the 8″ edge along the top of your scoring tool, score at:
- Cut one piece of Secret Sea Cardstock to 8″ x 5-1/2″.
- Hidden Panel
- Cut one piece of Secret Sea Cardstock to 1″ x 5″.
- With the 5″ edge along the top, score at:
- 3/4″, 1-1/2″, 3-1/2″, 4-1/4″
- With the 5″ edge along the top, score at:
- Cut one piece of Secret Sea Cardstock to 1″ x 5″.
- Designer Series Paper Panels
- Cut one piece of A Stitched Season Designer Series Paper to 10-1/2″ x 5-1/4″.
- Cut this piece into six panels measuring:
- 1-3/4″ x 5-1/4″
- Surprise Panel
- Cherry Cobbler Cardstock:
- 3-3/4″ x 5″
- Cherry Cobbler Cardstock:
- Stamped Panel
- Basic White Cardstock:
- 3-1/2″ x 4-3/4″
- Basic White Cardstock:
 Creating the Card Base
- Fold the Secret Sea card base along each score line, alternating the folds to create the accordion-style base.
- Attach one Designer Series Paper panel to each of the six visible sections of the folded card base using Stampin’ Seal.
- Take a moment to check the direction of the pattern before attaching all six panels. Designer Series Paper has a sneaky habit of turning upside down the moment the adhesive becomes permanent. Crafting physics, apparently.
- Creating the Surprise Panel
- Stamp the Woodland Wishes image on the Basic White panel using Secret Sea Classic Ink.
- Color the image with Watercolor Pencils, then blend the color gently with Blender Pens.
- Allow the panel to dry before handling it extensively. Although Blender Pens do not add much moisture, giving the paper a moment to settle helps prevent accidental smudges.
- Attach the stamped Basic White panel to the Cherry Cobbler panel using Stampin’ Seal.
- Creating the Hidden Support
- Fold the 1″ x 5″ Secret Sea hidden panel along all four score lines.
- The narrow sections at each end become adhesive tabs. The wider center section supports the Cherry Cobbler surprise panel and allows it to move forward when the card opens.
- Attach the hidden support inside the card base using Tear & Tape Adhesive. Position it carefully so the surprise panel remains centered and can move without catching on the folds.
- Attach the Cherry Cobbler surprise panel to the center section of the hidden support.
- Before pressing everything firmly into place, gently open and close the card to test the movement. This is the paper-crafting equivalent of “measure twice, glue once.” Once Tear & Tape commits, it is emotionally invested.
 Creating the Belly Band
- Cherry Cobbler Main Panel
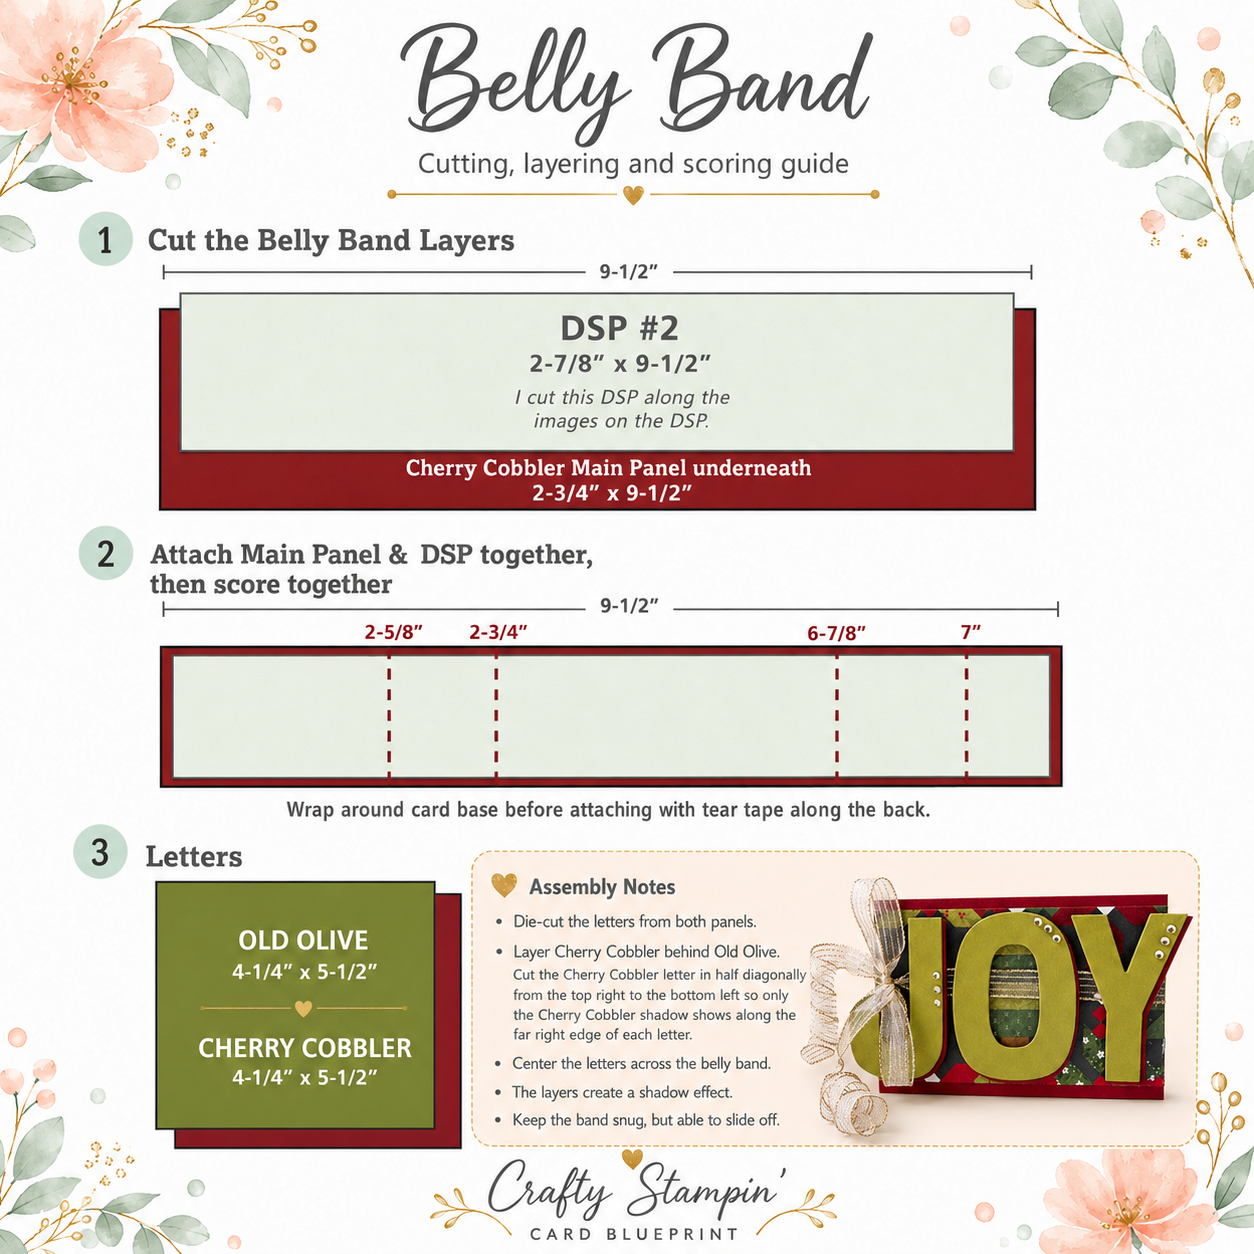
- Cut one piece to:
- 2-3/4″ x 9-1/2″
- Cut one piece to:
- Designer Series Paper Panel
- Cut one piece of A Stitched Season Designer Series Paper to approximately:
- 2-7/8″ x 9-1/2″
- I cut this piece along the printed images in the Designer Series Paper rather than forcing the pattern into an exact measurement. Depending on the section of paper you choose, your finished width may vary slightly.
- Cut one piece of A Stitched Season Designer Series Paper to approximately:
- Attach the Designer Series Paper to the Cherry Cobbler panel.
- Score both layers together at:
- 2-5/8″, 2-3/4″, 6-7/8″, 7″
- Wrap the layered strip around the closed card base.
- Do not wrap it too tightly. The belly band should fit securely but still slide on and off without wrestling the card into submission.
- Overlap the ends along the back and secure them with Tear & Tape Adhesive.
Creating the JOY Letters
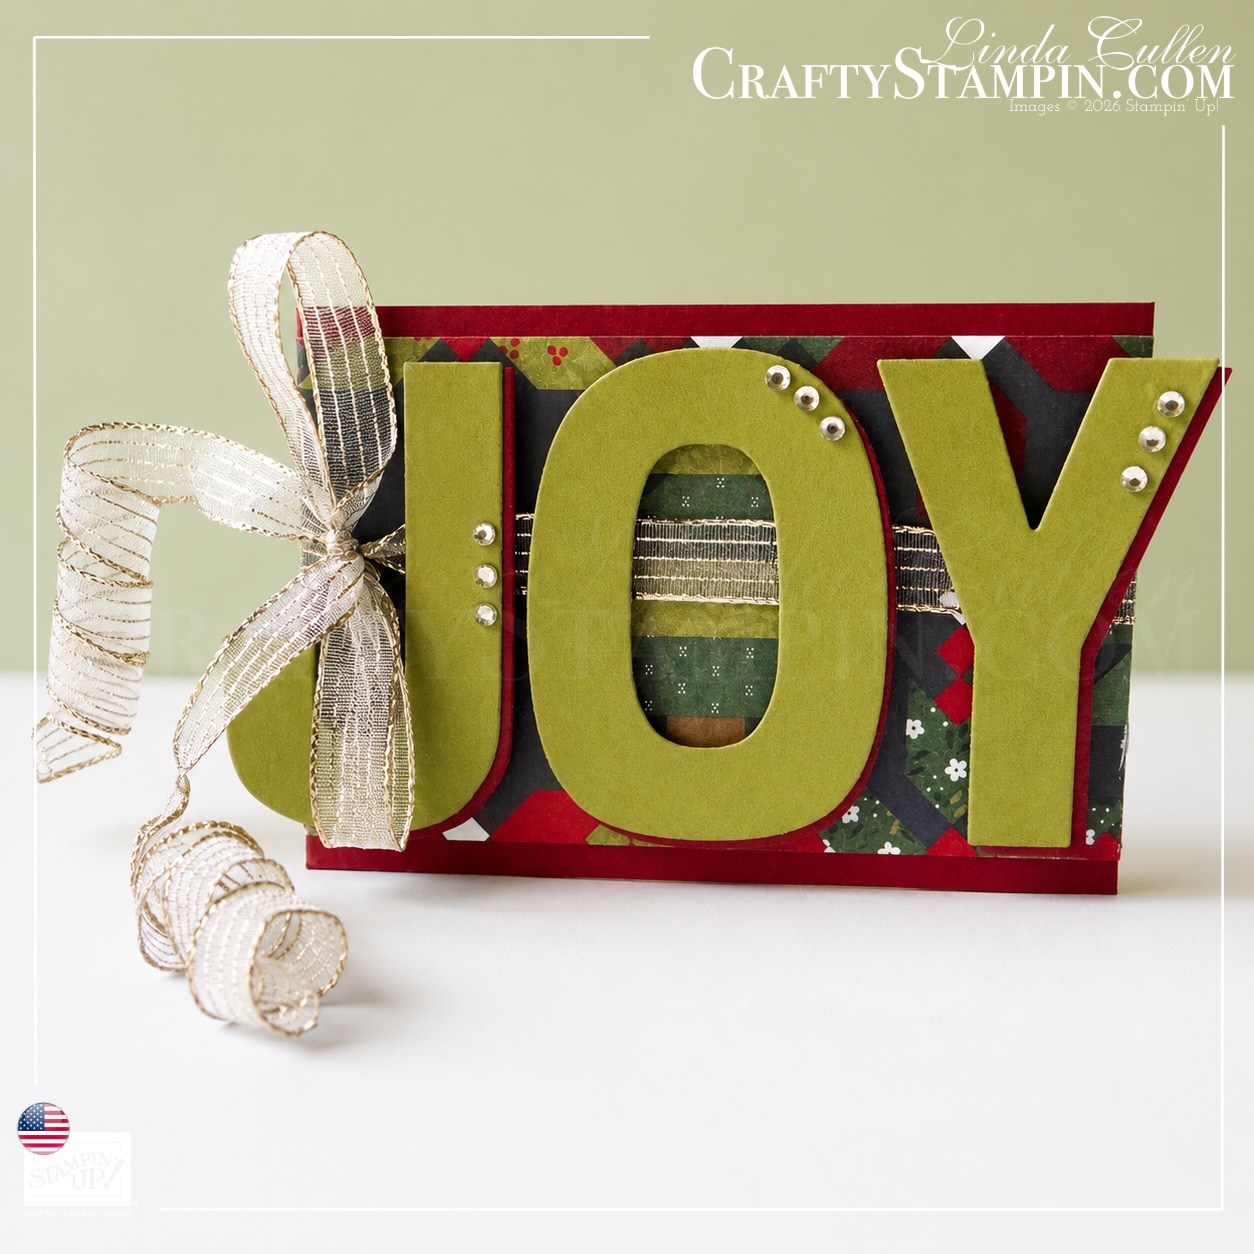
- Cut one piece each of Old Olive and Cherry Cobbler Cardstock to:
- 4-1/4″ x 5-1/2″
- Use the Party Alphabet Dies and Stampin’ Cut & Emboss Machine to cut the letters J, O, and Y from both colors.
- Layer each Old Olive letter over the matching Cherry Cobbler letter, offsetting the Cherry Cobbler slightly to create a shadow.
- Cut the Cherry Cobbler letter in half diagonally (top right to bottom left) so only the Cherry Cobbler “shadow” shows along the far right side of the Old Olive letter.
- Wrap a length of Gold Striped Mesh Ribbon around the belly band before attaching the letters, then tie the ribbon into a bow along the left side.
- Wrap each end of the ribbon around a Watercolor pencil, and heat with a Heat Tool to curl the ends.
- Arrange the layered letters across the front of the belly band and attach them with Dimensionals.
- Finish the letters with Rhinestone Basic Jewels. I added the rhinestones in small groups rather than covering every available inch. We are making Christmas sparkle, not signaling aircraft.
The Finished Surprise
- When the belly band is in place, the recipient sees the bold JOY greeting and beautiful holiday paper.
- After the band slides off and the card opens, the woodland panel moves forward from the center, revealing the complete Christmas scene.
- Secret Sea and Cherry Cobbler give the card a rich traditional foundation, while Old Olive, gold ribbon, and rhinestones add warmth and sparkle. The playful animals keep the design cheerful and prevent it from feeling too formal.
This card would be lovely for a special family member, a close friend, or anyone who appreciates a little interactive paper-crafting magic with their Christmas wishes.
Keep Hopping ⭐️
Thank you for stopping by to see my Christmas in July project for this month’s Team Stamp It Blog Hop.
I hope this Surprise Pop-Out Panel Card inspires you to get an early start on your holiday crafting. December has a habit of arriving approximately twelve minutes after Halloween, so July is not nearly as ridiculous as it sounds.
Continue through the complete list of participating designers below for more Christmas inspiration.
Remember to leave a comment on every blog using the hashtag #stampitcontest for your chance to win this month’s giveaway.
Linda Cullen, Crafty Stampin’
Giveaway
New Giveaway
Last Month’s Winner
Blog Hoppers
Crafty Stampin’ Craftroom Sale 🎉
Hunting for retired Stampin’ Up! products. My Craftroom Sale, think garage sale for crafty treasures, is stocked with long-retired gems and recent favorites.
👉 Browse the Craftroom Sale and grab your favorites before they’re gone for good!
(I’ve fixed the shipping issues on my blog🤞🏻. If you had issues in the past, head back over and check it out.)
Need a Catalog?
Woodland Wishes Card Color Palette
Woodland Wishes Card Supplies
Click on any product photo below to purchase your favorites from my online store and recreate these cards, or use this layout with supplies you already own. ✨
Discover more from Crafty Stampin'
Subscribe to get the latest posts sent to your email.
 Linda Cullen
Linda, love, love, love your card. The coloring is awesome!!
Beautiful card
This is an amazing card! Love everything about it.
#stampitcontest
Stunning card! Absolutely love it.
Love this card!
Cute cards
This is beautiful. Thank you for sharing
Love the card format and pretty papers! The image is so adorable with the cute critters!
#stampitcontest
Very cute card.
Love this project Linda!
#stampitcontest