
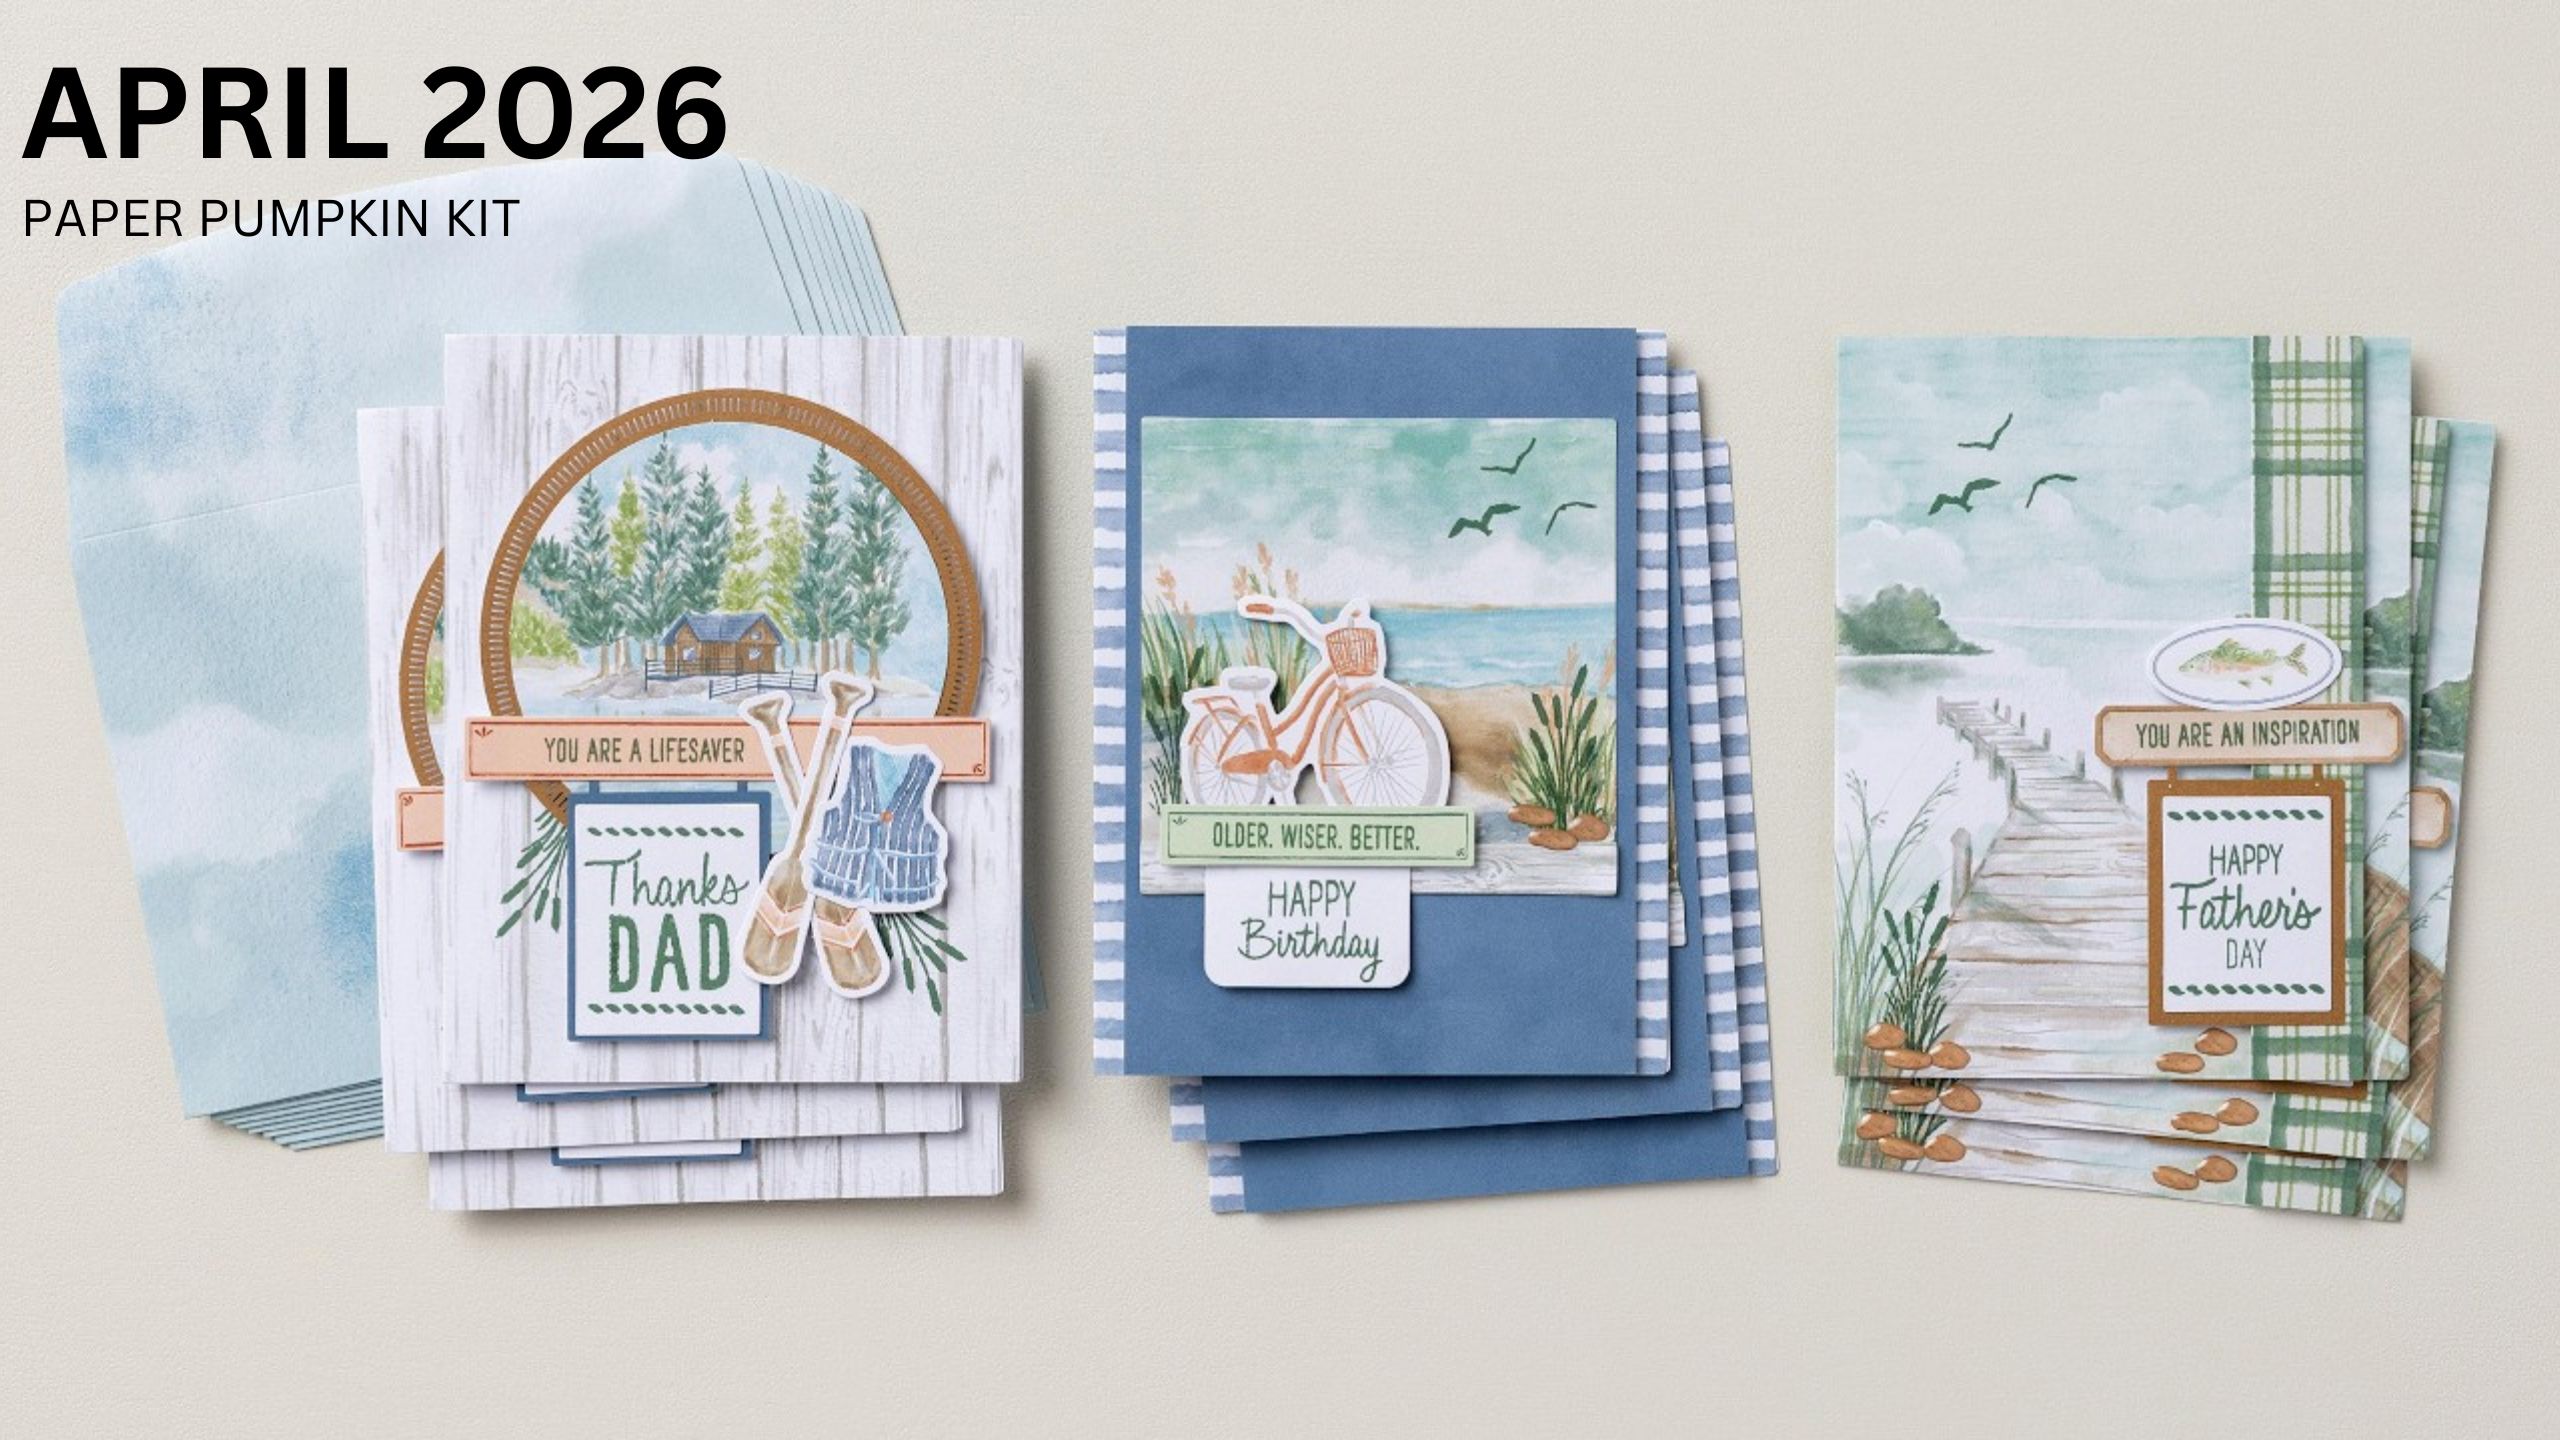
🎨 Lakeside Retreat – April 2026 Paper Pumpkin Alternatives
A Paper Pumpkin Thing Blog Hop Paper Pumpkin Z-Fold Card Alternatives
Welcome to another A Paper Pumpkin Thing, APPT, Blog Hop. Every month, our crafty crew takes the latest Paper Pumpkin Kit and gives it a little creative shake-up, because around here, the kit instructions are helpful, but they are not the boss of us. 😉
I am hopping with the talented PPX Crew and fellow Stampin’ Up! demonstrators to share fresh ideas, clever ways to stretch your kit supplies, and a few “why didn’t I think of that?” projects.
This month, I created two Z-fold cards using elements from the Paper Pumpkin Kit, plus a few favorite dies, cardstock colors, and ink from my stash. Both cards have that peaceful, outdoorsy, lakeside-cabin feel, which makes them perfect for masculine cards, birthdays, thank-you cards, or anyone who appreciates a good quiet moment by the water.
And yes, we are using the envelopes and card bases. Waste not, craft more. That is basically a life motto.
If you are new here, hi, I am Linda Cullen from Massachusetts, and you are visiting Crafty Stampin’. Scroll to the bottom of this post for the full list of blog hop stops so you can see all the creative alternatives made with this month’s Paper Pumpkin Kit.
For my two projects, I focused on turning the kit pieces into fun fold cards. Z-fold cards are one of my favorite ways to make a card feel extra special without requiring a crafting engineering degree. They look impressive, stand beautifully, and still give you plenty of room to decorate.
About These Paper Pumpkin Alternatives
For both cards, I used several pieces directly from the Paper Pumpkin Kit, including:
- Card bases
- Envelopes
- Die-cut images
- Included labels
- Stone embellishments
Then I added cardstock, ink, embossing, and dies from my craft room to give each card a little more structure and depth. The result is two coordinating cards that still feel very much like the kit, but with a fun fold twist.

Card 1, Happy Birthday Z-Fold Card
For my first card, I started with a Misty Moonlight cardstock card base and created a Z-fold. Misty Moonlight is such a great choice for this card because it pulls out the soft blues in the cabin scene without getting too dark or bossy. Nobody invited bossy cardstock to the party.
The background on the front Z-fold panel was cut from one of the envelopes included in the Paper Pumpkin Kit. I love using envelopes this way, especially when the printed patterns are too pretty to just seal up and send away.
For the inside background, I cut down one of the kit card bases to use its blue-and-white striped design. It gives the card’s interior a clean, crisp look and ties everything together beautifully.
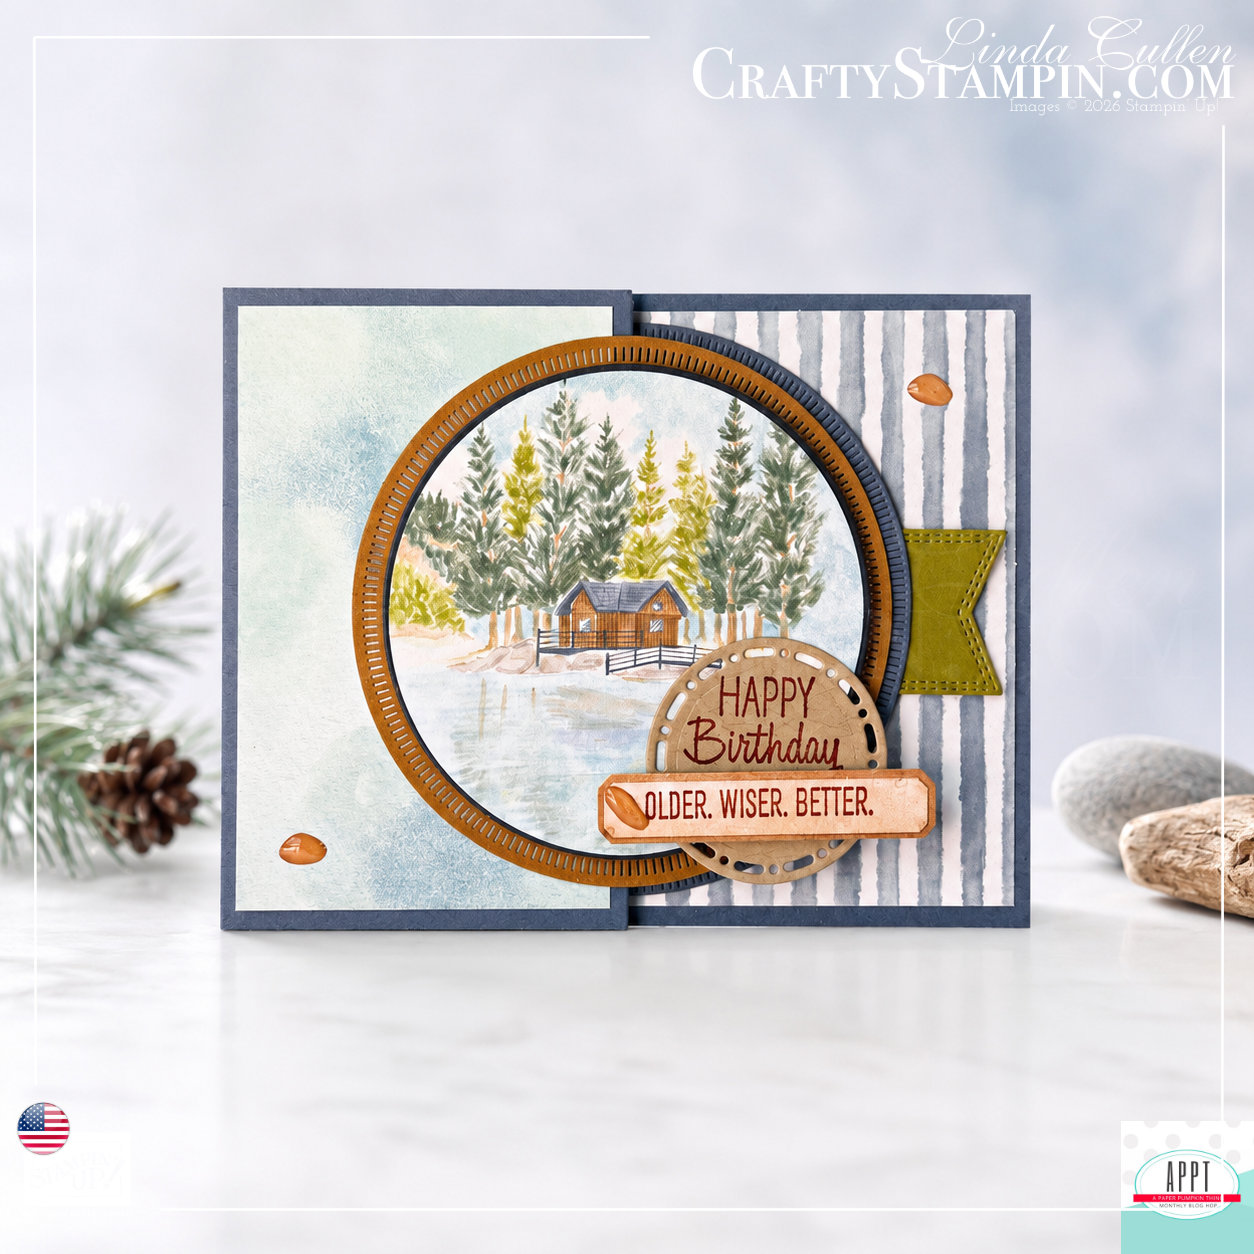
Creating the Focal Image
The front focal point uses the circle cabin image from the kit. I layered it onto a Secret Sea panel die cut using the second-largest circle from the Spotlight on Nature Dies. That piece was then popped up on Stampin’ Dimensionals over one of the included Pecan Pie die cuts.
That extra layering gives the cabin scene a little drama, but in a classy “I brought snacks to the cabin” kind of way, not a “the raccoon stole the cooler” kind of way.
The greeting is stamped in Cajun Craze ink on Crumb Cake cardstock, then die-cut with the second-smallest circle from the Spotlight on Nature Dies. The “Older. Wiser. Better.” sentiment is also stamped in Cajun Craze ink on one of the kit’s included labels.
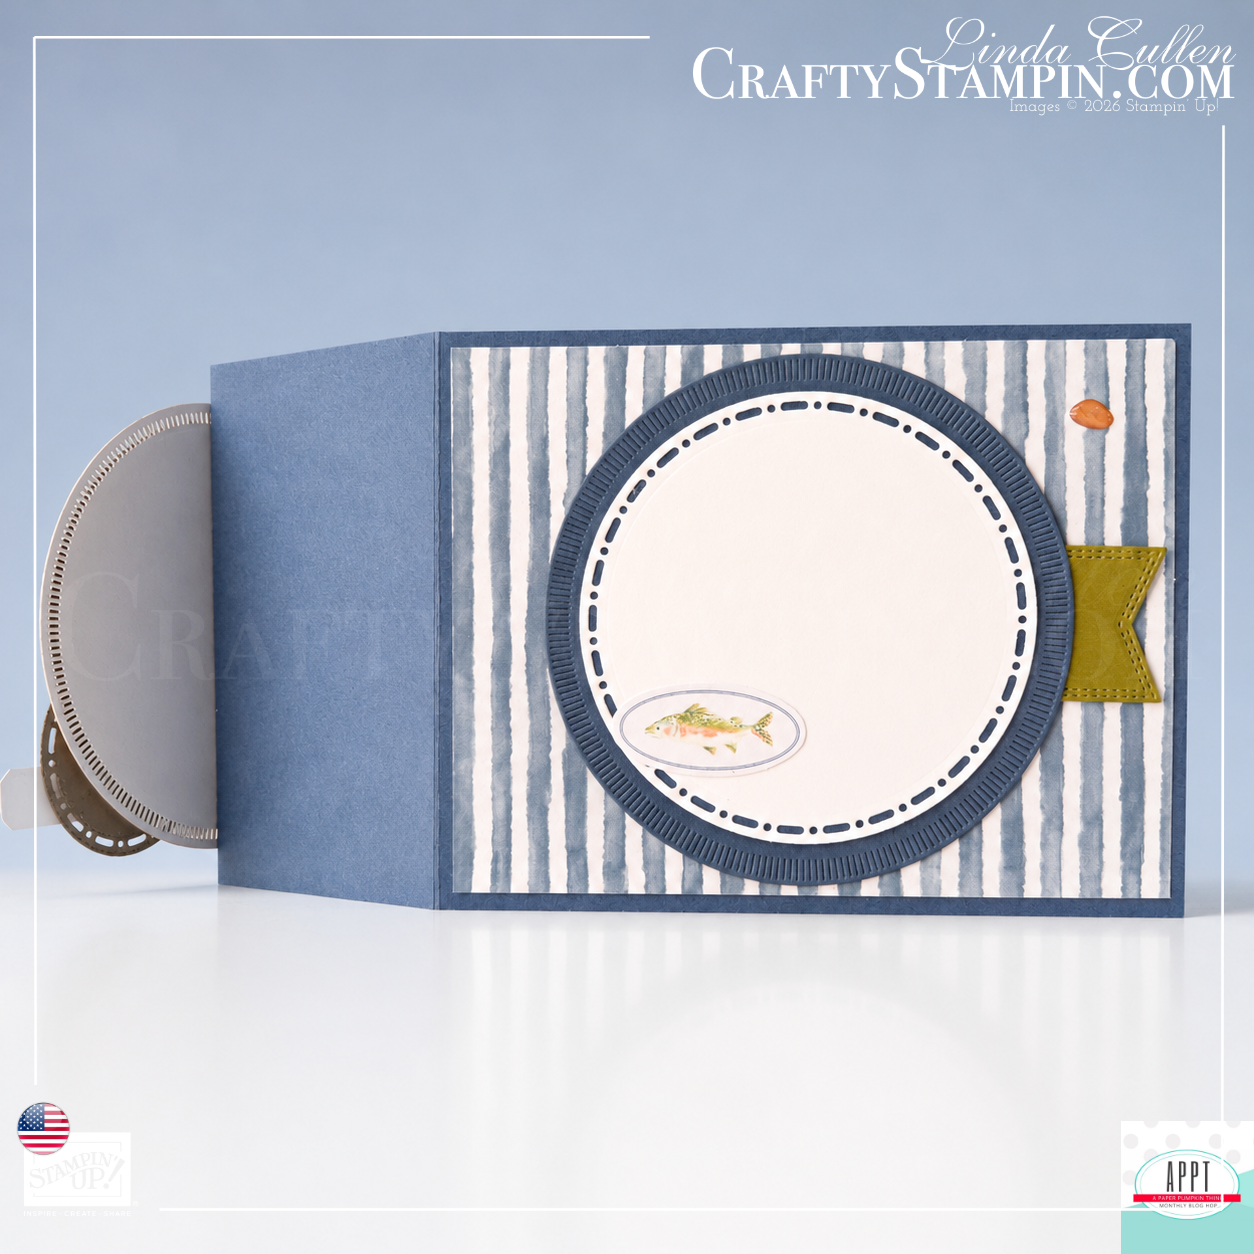
Inside the Card
When you open the card, the inside has even more kit goodness. Over the blue and white striped background, I added a large Misty Moonlight circle die cut using the largest circle from the Spotlight on Nature Dies. Then I layered a Basic White circle on top, cut with the second largest Spotlight on Nature circle die.
Under the circle, I tucked an Old Olive cardstock banner, cut with the second smallest banner die from the Nested Essentials Dies. A small fish die cut from the kit finishes off the writing area, along with several of the stone embellishments included in the kit.
The inside is clean, useful, and still decorated, because we are not animals. We decorate the inside too.
Card 2, You Are a Lifesaver Z-Fold Card
For my second project, I made another Z-fold card, this time using the new Peaceful Pine cardstock for the card base. This green is beautiful with the outdoorsy artwork in the kit, and it gives the whole card a calm, woodsy feel.
On the front Z-fold panel, I added a piece of Soft Sea Foam cardstock embossed with the Forever Plaid Embossing Folder. That embossed texture adds just enough interest without competing with the focal image.
The front image and the inside background both come from one of the kit card bases that I cut apart. I used the back portion as the inside designer paper layer, and cut the front portion down to create the main image panel.
The focal panel is mounted onto Pecan Pie cardstock, which warms up the card and works so nicely with the dock, canoe, and oars.
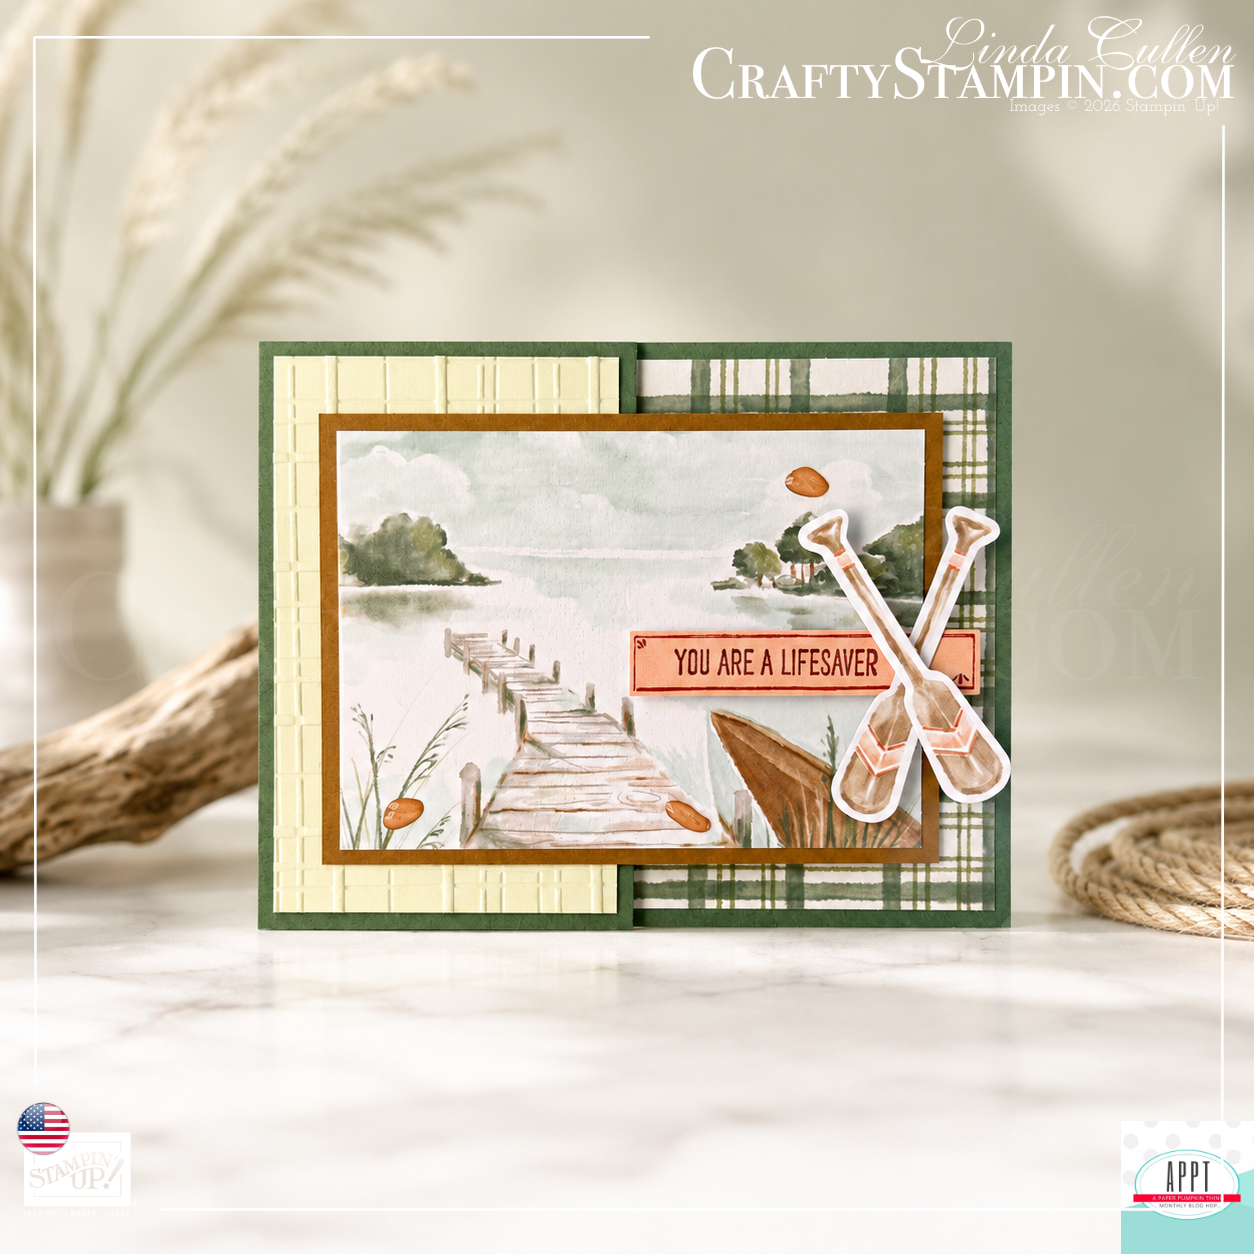
Front Details
The greeting is stamped in Cajun Craze ink on one of the kit labels. I cut the label down to fit the design, then tucked the cut end behind the crossed oars. Sneaky? Yes. Effective? Also yes. Crafting is at least 42% clever hiding.
The oars are layered right over the cut edge, so no one will ever know. Well, except you and me, and we are not telling.
The card is finished with several of the rock embellishments from the kit, which are such a fun little detail. They add texture and help carry that lakeside theme across the whole design.
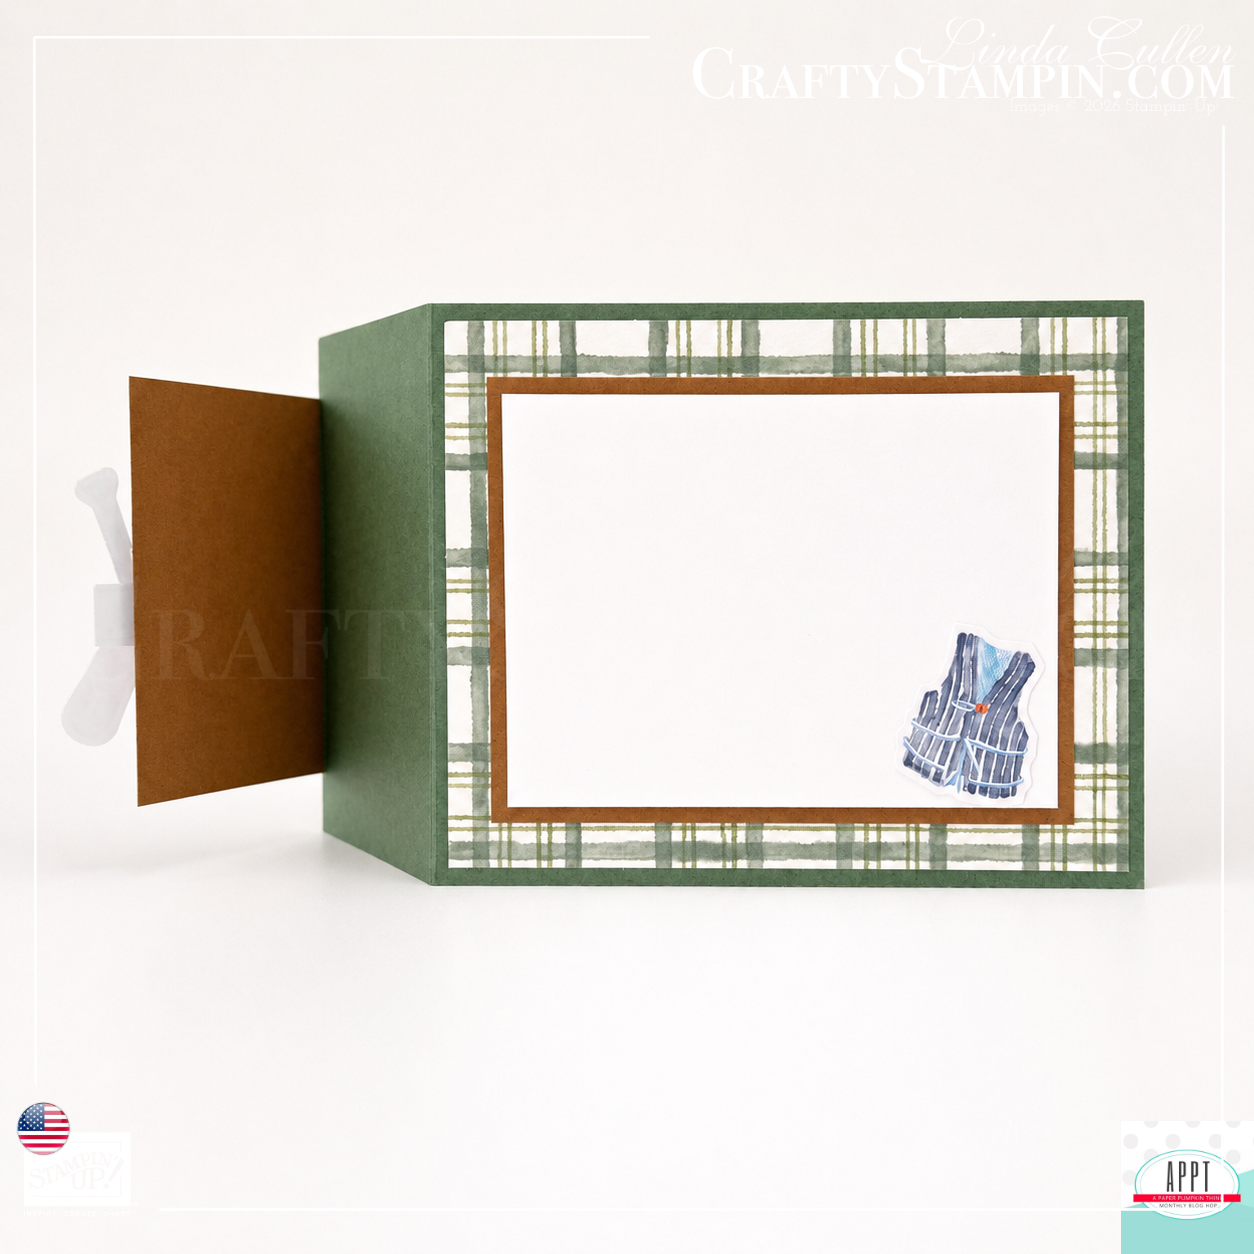
Inside the Card
For the inside, I added a Pecan Pie mat with a Basic White cardstock layer on top for writing a message. I also added the life jacket die-cut image from the kit as a sweet little accent.
The inside background was created from the cut-apart card base, so the whole project feels coordinated from front to back. Cutting apart card bases can feel a little rebellious the first time, but trust me, it is worth it. The card police are not coming.
Why I Love These Z-Fold Alternatives
These cards are a great example of how much more you can do with a Paper Pumpkin Kit when you look at the pieces differently. A card base can become designer paper. An envelope can become a background layer. A label can be trimmed, tucked, and transformed.
The kit gives you the bones. You get to add the personality.
And Z-fold cards are perfect for this because they let you show off multiple patterns and images at once. They also stand up beautifully, which makes them feel extra giftable.
Have You Tried Alternatives Yet?
Have you tried creating alternatives with your Paper Pumpkin Kit? I would love to hear what you made. Did you cut apart the card bases? Use the envelopes? Turn something into a fun fold? Or are you still staring at the pieces like they owe you an explanation?
Leave a comment and tell me what you created. Sharing ideas is half the fun, and the other half is pretending we are going to clean our craft desks afterward.
Paper Pumpkin Reminder
Paper Pumpkin is Stampin’ Up!’s monthly paper-crafting kit, delivered right to your mailbox. Each kit includes the supplies to create beautiful projects, and it is also a fantastic starting point for alternative designs like these.
The last day to subscribe for the next Paper Pumpkin Kit is the 10th of the month. Subscribe by then to guarantee your kit. After the subscription period, extras are not guaranteed, and we all know how that goes. You think about it too long, then poof, gone.
🧡 Keep Hopping!
Thanks for stopping by today. Now keep hopping through the APPT Blog Hop for more clever, creative, and totally worth-copying Paper Pumpkin alternatives.
Your next “oh, I need to make that” project is probably just one click away.🌻
🔗Helpful Links
🎃Learn more about Paper Pumpkin


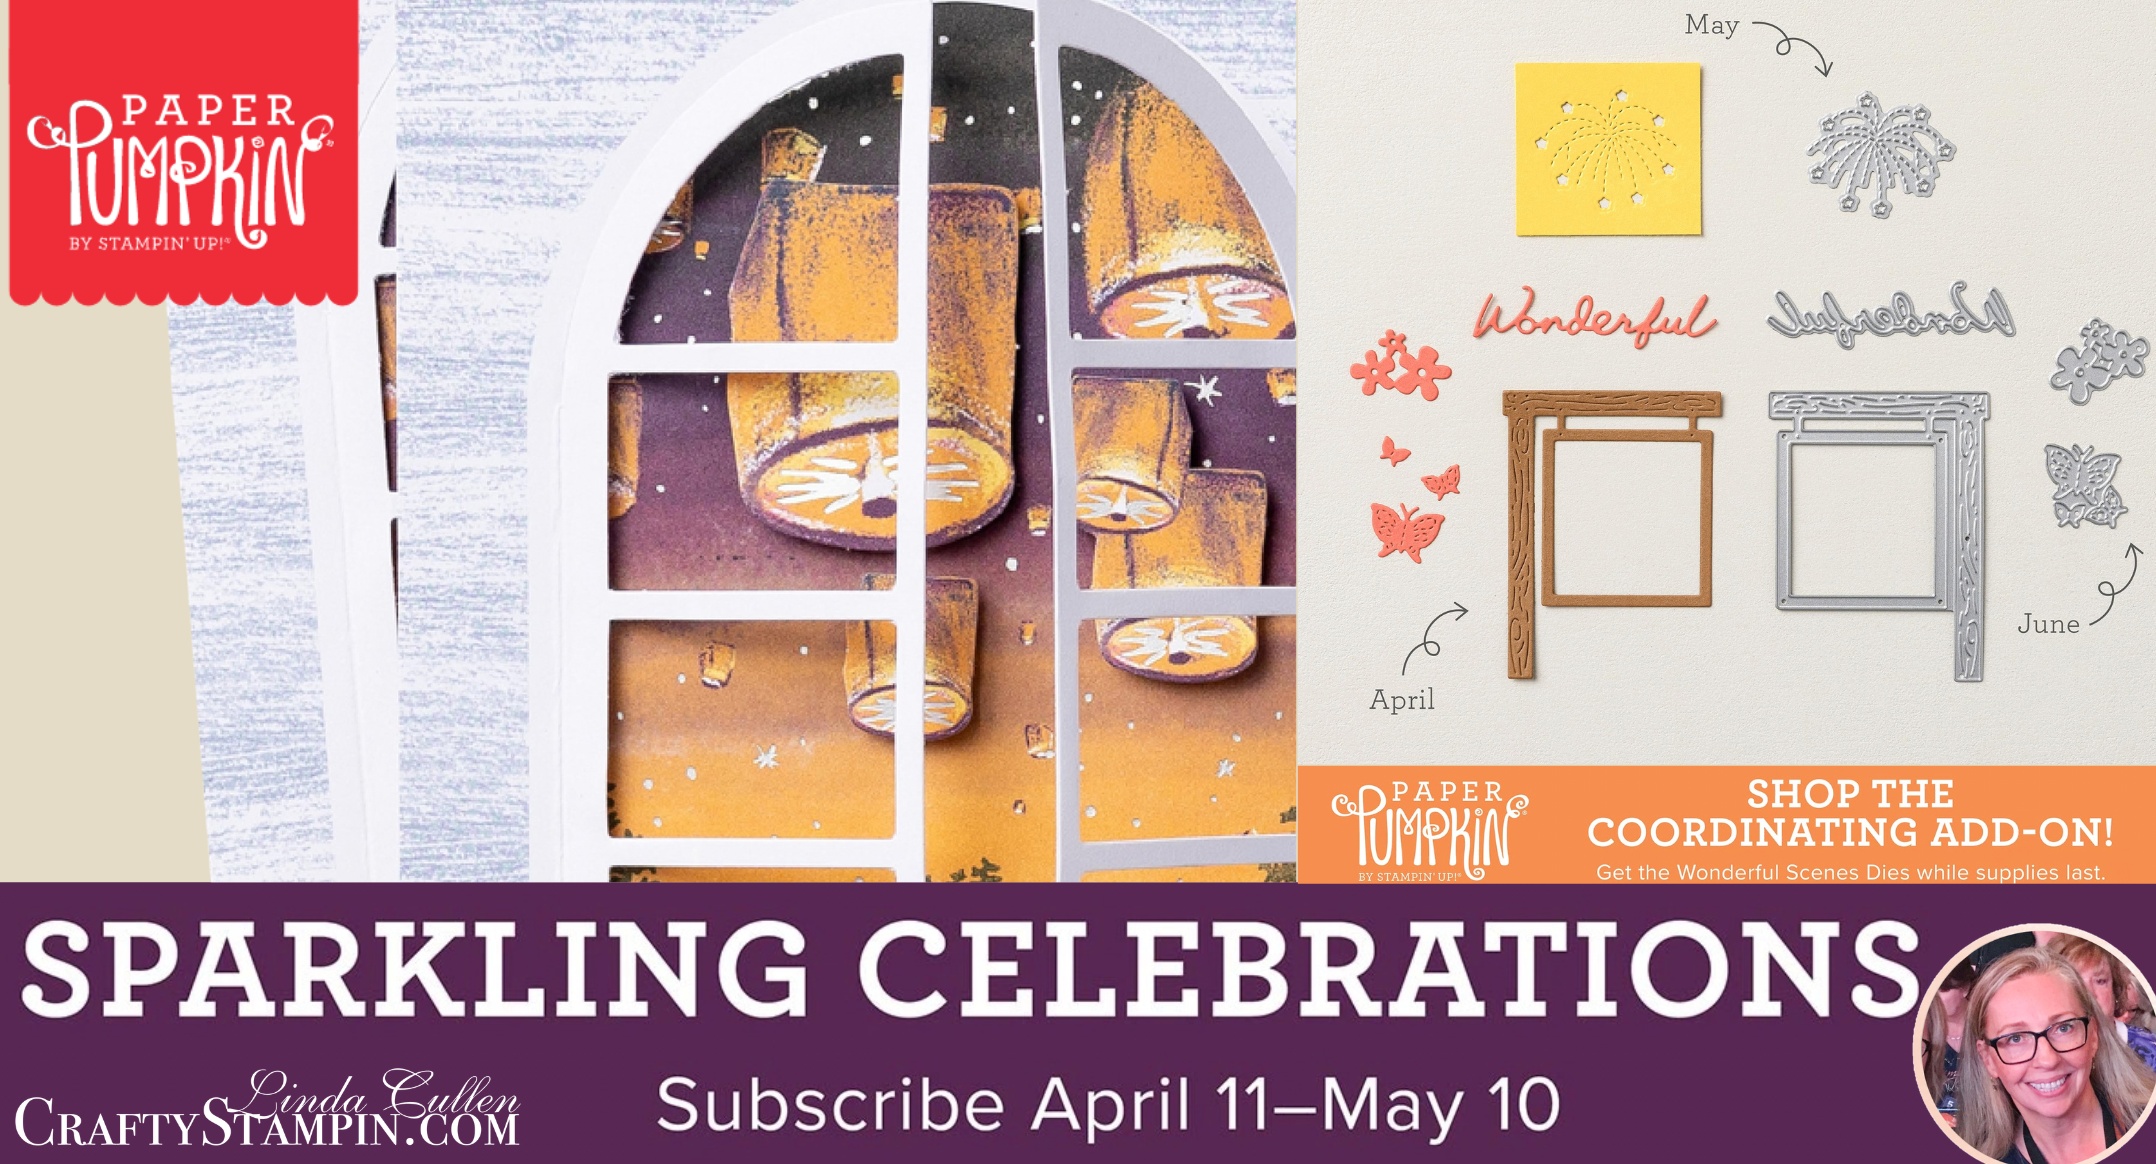
🗓️ Next Month’s Paper Pumpkin – Celebrate Spring
Subscribe by May 10th to receive the Sparkling Celebration kit and the exclusive PPX Crew video tutorials. If you love spring projects, this one is going to be a beauty.
Click on the image below to see the full details for next month’s kit.
🎨April 2026 Paper Pumpkin Alt Color Palette
📝
April 2026 Paper Pumpkin Alt Card Supplies
Click on any photo below to purchase the product from my online store.
Discover more from Crafty Stampin'
Subscribe to get the latest posts sent to your email.
Leave a Reply